BBB Device V2.6
Given the results of my previous post, I am reworking my design to make it more manufacturable.
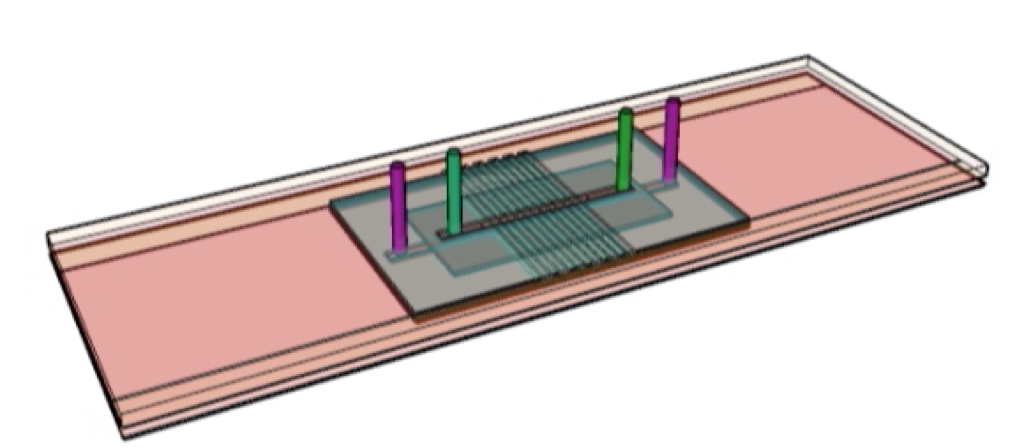
The major change compared to my last design is the inclusion of a full length microscope slide and coverslip. Instead of cleaving the electrodes from the glass, this step eliminates the need to embed the pieces into a PDMS gasket.
The benefits include having a long, planar area convenient for silicone-glass bonding, manufacturing time-savings, stronger bonding, and better structural support. However, in order to incorporate this change, holes must be drilled into the microscope slide to allow fluid to pass through to the appropriate channels, which will weaken the glass, making it more prone to cracking. It remains to be seen if the slides can be sputtered with this weakness; thermal shock does crack some coverglass with the current sputter process. Spacing the holes out further would also reduce the chance for cracking, but require redesigned gaskets. The microscope slide on top adds to the overall thickness of the device, but the working distance from the bottom is preserved, which utilizes a coverslip instead of a microscope slide. Also, the pumps can be housed on top of the device, next to the PDMS feet.
I hope to prevent the leaking in the stack of silicone gaskets with this redesign, which were endemic to BBB device V2.5. Also, this redesign will also help us to prepare for the filter order where fluidic vias are etched through the bulk silicon, removing the need for the interstitial gasket.
Materials
PDMS Feet
Top Channel Gasket
Filter Gasket
Bottom Channel Gasket
Microscope Slide (4x holes, patterned ITO)
Coverglass (patterned ITO)
Process Flow:
1. Drill 4 holes in Microscope Slides
– Immerse slide in water, tape down, then drill using diamond bit. Use old gasket for alignment of holes.
2. Clean Slides and coverglass with Pirahnna Clean
3. Sputter 1000 angstroms of ITO on slides and coverglass
4. Photolithography of slides and coverglass
a. HDMS Prime (1500 RPM, 60s)
b. Dehydration Bake (100C for 60s)
c. Lithography (Mask Aligner, 10sec)
– Soft Bake (100C for 60s)
d. Puddle Develop (60s)
e. Spin-rinse (1500 RPM 60s, 30s Acetone, 30s DI Water)
f. Hard Bake (150C for 180s)
– baking for too long will make the photoresist too hard to strip off with acetone
5. Etch coverglass and slides in 12M HCl Acid for 15 seconds, rinse in DI water, oven dry, acetone to strip photoresist
– wipe off photoresist with acetone to expose unwanted ITO regions to etch
6. Inspect slides and coverglass
– test for electrical isolation using multimeter
– clean with Ethanol or Isopropyl Alcohol, dry
7. Cut out gaskets using Silhouette Printer
8. Ozone bond PDMS feet to microscope slide
– all ozone bond steps are 13 minutes of exposure
– Shrink wrap
– 30 minutes in the oven (70C), then left overnight
– multiple steps may be combined for shrink wrap and curing in the oven
– When finished curing, create holes for capillaries in the PDMS feet
9. Ozone bond top channel gasket to microscope slide
10. Ozone bond bottom channel gasket to coverglass
11. Ozone bond pnc-Si filter to bottom gasket (flat side down)
12. Ozone bond Filter gasket to bottom + pnc-Si (wrap around)
13. Ozone bond top gasket to filter gasket
14. Insert Glass Capillaries
15. Sterilize by placing the device into a covered beaker, and autoclave (recipe 4, ~60 minutes)
16. Connect tubing
Greg, sorry I had to miss your post last Tuesday. I was just reading over this, and maybe this was brought up, but could the vias in the glass go through the slide instead of the the cover slip? This would potentially solve the cracking issue, and if your microscope images from the bottom, this would also make it more convenient to use possibly?